ADVERTISEMENT
Removal Guide for Popcorn Ceilings: A Step-by-Step Guide to Getting Rid of It
Popcorn ceilings, also known as textured ceilings, were once a popular design feature in homes during the mid-20th century. However, as styles have evolved, many homeowners now prefer the sleek, modern look of smooth ceilings. If you’re looking to update your home, removing popcorn ceilings can dramatically enhance the appearance and increase the value of your space. While the task may seem daunting, with the right tools and techniques, it’s entirely possible to remove popcorn ceilings on your own.
In this step-by-step guide, we’ll walk you through everything you need to know to safely and efficiently remove popcorn ceilings, and achieve a smooth, modern finish in your home.
Why Remove Popcorn Ceilings?
Before diving into the removal process, it’s helpful to understand why you might want to get rid of popcorn ceilings in the first place:
- Aesthetics: Popcorn ceilings can look outdated and may not complement modern home designs.
- Health Concerns: Older popcorn ceilings (pre-1980s) may contain asbestos, which is a health hazard when disturbed. Testing for asbestos is important before removal.
- Cleaning Difficulties: Popcorn ceilings can be difficult to clean and may trap dust, cobwebs, and other debris, making them hard to maintain.
- Increased Home Value: Removing popcorn ceilings and replacing them with a smooth finish can increase the overall value of your home, making it more attractive to potential buyers.
Step-by-Step Guide to Removing Popcorn Ceilings
Step 1: Test for Asbestos
Before beginning the removal process, it’s crucial to test your popcorn ceiling for asbestos if your home was built before the 1980s. Asbestos can be harmful if disturbed, so it’s essential to know if it’s present. You can purchase an asbestos test kit or hire a professional to test the ceiling. If asbestos is present, you should consult with a certified abatement specialist to handle the removal safely.
Step 2: Gather Your Tools and Materials
For a successful popcorn ceiling removal, you’ll need the following supplies:
- Ladder (to reach high areas safely)
- Drop Cloths or Plastic Sheeting (to protect furniture and floors)
- Painter’s Tape (to secure plastic sheeting)
- Spray Bottle with Water (to dampen the ceiling)
- Putty Knife or Scraper (for scraping off the popcorn texture)
- Dust Mask or Respirator (to protect against dust and debris)
- Safety Goggles (to protect your eyes from debris)
- Shop-Vac or Broom and Dustpan (for cleaning up dust and debris)
- Sanding Block or Pole Sander (for smoothing the ceiling)
- Joint Compound (for patching up any imperfections)
- Paint and Primer (for finishing the ceiling after removal)
Step 3: Prepare the Room
Before you start scraping, it’s important to prepare the room to minimize mess and protect your belongings:
- Remove Furniture: Clear the room of furniture, or if that’s not possible, move it to the center and cover it with plastic or drop cloths.
- Cover the Floor: Lay plastic sheeting or drop cloths across the floor to catch debris and make cleanup easier.
- Tape Plastic to the Walls: Secure plastic sheeting to the walls using painter’s tape to protect them from water and debris.
- Turn Off the Power: If you have ceiling lights, turn off the electricity to avoid any accidents while working near electrical fixtures.
Step 4: Wet the Ceiling
Popcorn ceilings are made from a textured plaster that can be difficult to remove if it’s dry. To make the process easier, you’ll need to dampen the ceiling:
- Fill a spray bottle with water.
- Lightly spray sections of the ceiling (about 5-6 square feet at a time).
- Let the water sit for 10-15 minutes to soften the texture.
- Be careful not to soak the ceiling, as excess water can damage the drywall underneath.
Step 5: Scrape Off the Popcorn Texture
Once the ceiling has been dampened, it’s time to start scraping:
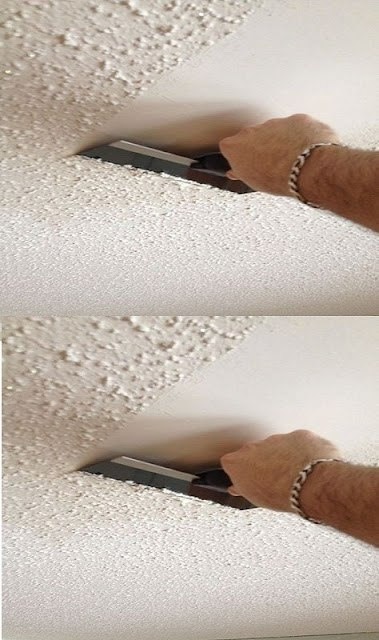
- Use a wide putty knife or scraper to gently scrape the popcorn texture off the ceiling. Hold the scraper at a slight angle and work in a smooth motion.
- Be patient and avoid applying too much pressure, as you don’t want to damage the drywall underneath.
- Continue this process, working in small sections until the entire ceiling is clear of the popcorn texture.
For Complete Cooking STEPS Please Head On Over To Next Page Or Open button (>) and don’t forget to SHARE with your Facebook friends
ADVERTISEMENT
