ADVERTISEMENT
Instructions:
1. Prepare the Crust:
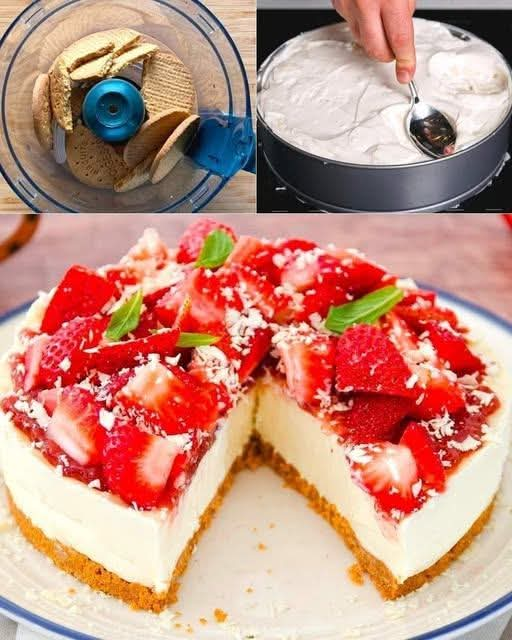
- Mix the Ingredients: In a medium bowl, combine the graham cracker crumbs and sugar. Add the melted butter and stir until the mixture is evenly coated and resembles wet sand.
- Press into Pan: Press the graham cracker mixture into the bottom of a 9-inch springform pan (or a regular pie dish) to form a uniform crust. Use the back of a spoon or your fingers to compact the crumbs firmly.
- Chill: Place the crust in the fridge for at least 30 minutes to set while you prepare the cheesecake filling.
2. Make the Cheesecake Filling:
- Whip the Cream: In a large mixing bowl, whip the heavy cream until stiff peaks form. This will give your cheesecake a light, airy texture.
- Blend the Cream Cheese: In a separate bowl, beat the softened cream cheese with an electric mixer until smooth and creamy. Add the powdered sugar, vanilla extract, and lemon juice, and beat again until fully combined.
- Fold in the Whipped Cream: Gently fold the whipped cream into the cream cheese mixture. Be careful not to deflate the whipped cream too much—this will ensure the cheesecake filling remains light and fluffy.
- Optional: Add Gelatin: If you prefer a firmer cheesecake filling, dissolve the gelatin in a little warm water according to package instructions and fold it into the mixture.
3. Assemble the Cheesecake:
- Fill the Crust: Pour the cheesecake filling into the prepared graham cracker crust. Use a spatula to smooth the top and make it even.
- Chill: Place the cheesecake in the fridge and allow it to set for at least 4 hours, preferably overnight. The longer it sets, the firmer and creamier the texture will become.
4. Prepare the Strawberry Topping:
- Make the Strawberry Sauce: In a small saucepan, combine the sliced strawberries, sugar, and lemon juice. Cook over medium heat for about 5-7 minutes, stirring occasionally, until the strawberries release their juices and begin to soften.
- Thicken the Sauce (Optional): If you want a thicker topping, dissolve the cornstarch in a tablespoon of water and add it to the strawberry mixture. Stir well and cook for another minute until the sauce thickens slightly.
- Cool the Topping: Remove the strawberry sauce from the heat and allow it to cool to room temperature. You want it to be slightly warm, but not hot, before spreading it over the cheesecake.
5. Top and Serve:
- Add the Topping: Once the cheesecake has set, pour the cooled strawberry topping over the top, spreading it evenly. You can garnish with extra fresh strawberries for a beautiful touch.
- Serve: Slice the cheesecake and serve chilled. Enjoy the perfect balance of creamy cheesecake and sweet, tangy strawberries in every bite!
Pro Tips for the Perfect No-Bake Strawberry Cheesecake
- Use Fresh Strawberries: Fresh strawberries work best for the topping. If you’re using frozen strawberries, be sure to thaw them completely and drain any excess liquid before using.
- Make Ahead: This cheesecake is great for making ahead of time. In fact, it tastes even better after chilling for a day or two, allowing the flavors to meld together.
- Add a Twist: Feel free to get creative with your cheesecake by adding other fruits like blueberries, raspberries, or mango for a tropical twist. You can even add a layer of fruit puree for extra flavor!
- Firmness Tips: If you like your cheesecake on the firmer side, consider adding more gelatin or using less whipped cream. For a softer, mousse-like texture, add more whipped cream for an airy, light result.
Why You’ll Keep Coming Back to This Recipe
This No-Bake Strawberry Cheesecake is a dessert everyone can enjoy—whether you’re hosting a party, having a family dinner, or simply craving something sweet. It’s the perfect combination of creamy, tangy cheesecake and juicy, sweet strawberries, making it an ideal treat for any season.
With just a few simple ingredients and a little patience while it sets, you can have a dessert that rivals any bakery cheesecake. Plus, there’s no baking involved, so it’s easy to make, and clean-up is a breeze.
This dessert is sure to become your go-to for any occasion. So why not give it a try and let the sweetness of the season shine in every bite? Enjoy!
ADVERTISEMENT
ADVERTISEMENT
