ADVERTISEMENT
Step 1: Clean the Surface
Before you begin repairing the peeling area, clean the surface of your leather item to remove dirt, dust, and oils that could interfere with the repair.
- Mix a small amount of mild soap with warm water.
- Dampen a soft cloth or sponge with the soapy water, and gently wipe down the affected area.
- Dry the area with a clean, dry cloth to remove excess moisture.
- If you’re working with imitation leather, use a leather cleaner that’s safe for synthetic materials.
Proper cleaning ensures that the repair material will bond effectively to the surface.
Step 2: Assess the Damage
Inspect the peeling area to determine the extent of the damage.
- If the peeling is minor and only affects the surface layer, you can repair it without much hassle.
- If the leather is heavily damaged or has deep cracks, you may need to apply a repair patch first to fill in any gaps.
For minor damage, continue to the next step. For larger or deeper cracks, you may need to apply a patch using a leather repair kit, which typically includes adhesive and a repair fabric.
Step 3: Repair the Peeling Area
For real leather:
- Apply a small amount of leather adhesive directly to the peeled area using a cotton swab or small brush.
- Gently press the peeled section back into place and hold for a few seconds to ensure a firm bond.
- If the damage is more extensive, you may need to use a leather repair paste to fill in any gaps and smooth out the surface.
For imitation leather:
- For small tears or peels, use a specialized faux leather repair compound that matches the color of your item. Apply a thin layer of the compound over the damaged area using a plastic spatula.
- For larger areas, you can cut a piece of matching faux leather from the repair kit to create a patch. Apply adhesive to the underside of the patch and press it firmly onto the damaged area.
- Smooth the edges of the patch to ensure there are no visible seams, and ensure it is completely secure.
Step 4: Smooth and Blend the Repair
After applying the adhesive or repair paste, you’ll want to blend the repair seamlessly with the surrounding surface.
- Use a small spatula or your fingers to smooth the repair material evenly over the damaged area.
- For imitation leather, you can use sanding paper gently to smooth out the edges of the repair. Be careful not to damage the surrounding area.
- Allow the repair to dry completely before moving to the next step. Drying times can vary depending on the product used, but generally, you should wait at least 1-2 hours.
Step 5: Restore the Color (If Necessary)
Once the repair is dry and smooth, you may need to restore the color of the repaired area to match the rest of the item. This is particularly important for faux leather, as it may not have the same finish as real leather.
- Use a leather or vinyl dye or paint that matches the color of your item. Many leather repair kits come with a matching dye that can be applied with a brush.
- Gently apply the dye in thin layers, allowing each coat to dry before adding another. This ensures an even, natural finish.
- For real leather, consider using a leather conditioner or cream to bring back the shine and restore the leather’s natural luster.
Step 6: Protect the Repair
To ensure the longevity of your repair, it’s important to protect the surface from future damage.
- For real leather, apply a leather conditioner after the repair. This will help restore moisture to the leather and keep it supple.
- For faux leather, apply a clear acrylic sealer to protect the surface and maintain its appearance. This will also help prevent future peeling.
- Allow the item to dry completely before using it again.
Step 7: Prevent Future Peeling
Once your item is repaired, it’s essential to take steps to prevent future peeling:
- For real leather: Regularly clean and condition your leather items to keep them moisturized and prevent cracking. Store them in a cool, dry place away from direct sunlight.
- For imitation leather: Avoid excessive friction and exposure to heat, as this can cause the material to break down over time. Regular cleaning and the occasional application of a protective coating can help prolong its life.
Conclusion
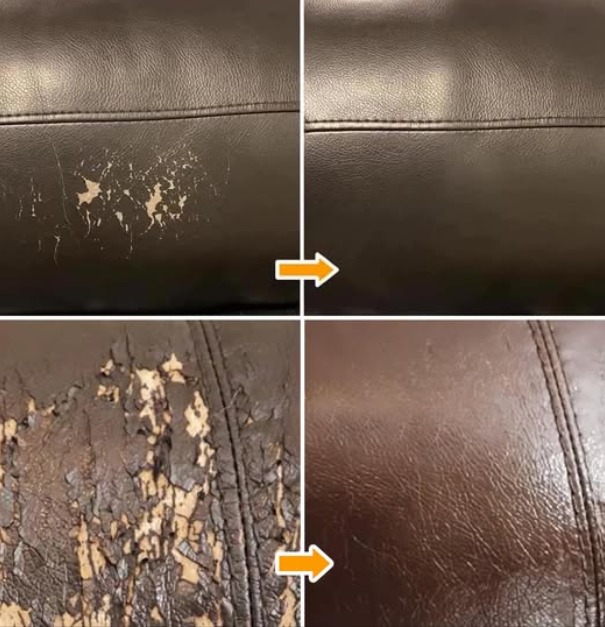
Repairing peeling leather or imitation leather is a manageable task that can save your beloved items and extend their use. With the right materials and techniques, you can restore their appearance and functionality, making them look as good as new. Whether you’re dealing with a favorite jacket, a handbag, or a piece of furniture, this step-by-step guide will help you get your leather goods back in tip-top shape!
ADVERTISEMENT
