ADVERTISEMENT
For the Jelly Layers:
- 3 different colored jelly packets (choose vibrant colors like red, green, and yellow or mix and match your favorites)
- Water (for preparing the jelly)
- 1 can of sweetened condensed milk (for the creamy layer)
- 250g (about 1 cup) of cream cheese, softened
- 1 cup of whipped cream (or heavy cream, for whipping)
- 1 tablespoon of gelatin (to set the cream layer)
Garnish (optional):
- Fresh berries (such as raspberries, strawberries, or blueberries)
- Whipped cream for decoration
- Mint leaves for a touch of green
How to Make the Festive Jelly Slice
Step 1: Prepare the Biscuit Base
- Start by crushing your digestive biscuits or Graham crackers into fine crumbs. You can do this by placing them in a ziplock bag and smashing them with a rolling pin, or by pulsing them in a food processor.
- Combine the biscuit crumbs with the melted butter and sugar (if using). Stir until the mixture is evenly coated and resembles wet sand.
- Press the crumb mixture into the base of a lined baking dish or square pan, creating an even layer. Use the back of a spoon to compact it.
- Refrigerate the base for about 15-20 minutes to allow it to firm up before adding the jelly layers.
Step 2: Make the Jelly Layers
- Prepare each jelly packet according to the package instructions. Typically, this involves dissolving the jelly crystals in boiling water, then letting the mixture cool slightly before refrigerating it to set.
- Layering the Jelly: For a beautiful, layered effect, you’ll need to pour the jelly into the dish in stages. Start with your first jelly flavor (for example, red) and pour it gently over the set biscuit base. Refrigerate for about 30 minutes to an hour, or until the jelly is firm but not fully set.
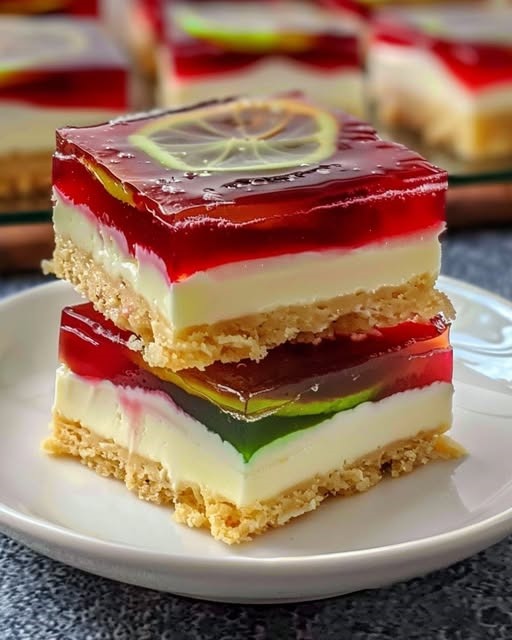
- Once the first layer is firm, repeat the process with the second color (green, for example), and then refrigerate again to allow it to set. Follow the same steps with the third jelly color. By layering the jelly in stages, you’ll create a beautiful, striped effect in the finished slice.
- After the jelly layers have fully set, move on to the next step.
Step 3: Make the Creamy Layer
- In a medium bowl, combine the softened cream cheese with the sweetened condensed milk. Use an electric mixer to blend the ingredients until smooth and creamy.
- In a separate bowl, whip the cream until soft peaks form. Then, fold the whipped cream gently into the cream cheese mixture until well combined.
- In a small bowl, dissolve the gelatin in a little warm water (about 1-2 tablespoons). Add this gelatin mixture to the cream mixture, stirring until fully incorporated.
- Pour the creamy mixture over the set jelly layers, spreading it evenly with a spatula.
- Return the dessert to the refrigerator and let it set for at least 3-4 hours, or preferably overnight, until the cream layer is firm.
Step 4: Garnish and Serve
- Once the Festive Jelly Slice is fully set, garnish with fresh berries and mint leaves for a touch of freshness and color.
- Slice into squares or rectangles and serve chilled. The layers will be beautifully visible, and each bite will be a creamy, fruity, and refreshing delight.
Tips for Perfecting Your Festive Jelly Slice:
- Use a sharp knife when cutting the slice to keep the layers intact and create clean, neat edges.
- Let each jelly layer set completely before adding the next one. This will help maintain the integrity of the layers and prevent the colors from bleeding into each other.
- Experiment with different jelly flavors: If you’re feeling adventurous, try using tropical fruit-flavored jellies, or go with a more subtle flavor like lemon or lime to balance the sweetness.
- For a smooth base: If you don’t have digestive biscuits, graham crackers, or similar cookies, you can also use crushed shortbread or any other plain biscuit. Just make sure the base is sturdy enough to hold the layers.
Why You’ll Love This Festive Jelly Slice
The Festive Jelly Slice is the perfect dessert to bring to any celebration. The combination of creamy, fruity layers and the crunchy biscuit base makes it a delightful and refreshing treat. It’s a crowd-pleaser, especially for kids, and adds a festive, colorful touch to any table.
This dessert is easy to make ahead of time and requires no baking, making it an excellent option for busy holidays when you need to focus on other dishes. Plus, it’s highly customizable—feel free to experiment with different jelly flavors and add-ins to suit your taste!
Whether you’re hosting a family dinner, attending a holiday party, or just want a fun treat for your next get-together, the Festive Jelly Slice will undoubtedly become a favorite in your dessert repertoire.
Conclusion: A Sweet, Colorful Treat for the Holidays
The Festive Jelly Slice is a fun, colorful, and light dessert that will add a pop of brightness to any celebration. Its layers of jelly and creamy filling, paired with a biscuit base, create the perfect balance of textures and flavors. With a few simple steps and ingredients, you can make this visually stunning dessert that will have your guests coming back for more. So, get ready to impress your friends and family with this festive treat that’s as delightful to look at as it is to eat!
ADVERTISEMENT
ADVERTISEMENT
