ADVERTISEMENT
Instructions:
1. Activate the Yeast:
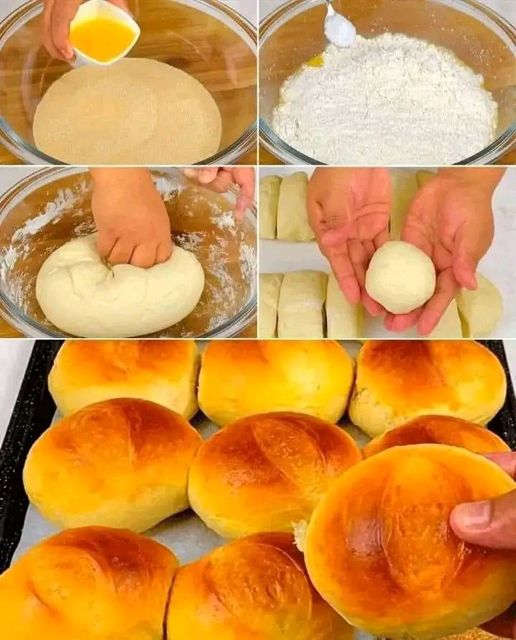
In a small bowl, combine the warm water, sugar, and yeast. Stir gently to dissolve the sugar and yeast in the water. Let it sit for about 5-10 minutes, or until the mixture becomes frothy. This step is important because it ensures that the yeast is active and ready to help your dough rise.
2. Mix the Dough:
In a large mixing bowl, combine the flour and salt. Once the yeast mixture is frothy, pour it into the bowl with the flour and salt. Add the olive oil as well. Stir with a wooden spoon or spatula until the mixture begins to come together into a dough.
3. Knead the Dough:
Transfer the dough onto a lightly floured surface and knead it for about 8-10 minutes. Kneading helps develop the gluten, which is essential for a fluffy, chewy texture in your bread. If the dough is too sticky, sprinkle a little more flour on the surface, but avoid adding too much to keep the dough from becoming too dry. When the dough is smooth and elastic, form it into a ball.
4. First Rise:
Place the dough ball in a lightly oiled bowl, and cover it with a clean kitchen towel or plastic wrap. Let it rise in a warm place for about 1-2 hours, or until it has doubled in size. This is when the yeast does its magic, making the dough light and airy.
5. Shape the Dough:
Once the dough has risen, punch it down to release the air. Turn it out onto a floured surface and shape it into a round or oval loaf, depending on your preference. You can also shape it into smaller rolls if you prefer.
6. Second Rise:
Place the shaped dough onto a parchment-lined or greased baking sheet. Cover it again with a towel and let it rise for another 30-45 minutes, or until it puffs up.
7. Preheat the Oven:
While the dough is going through its second rise, preheat your oven to 450°F (230°C). A high oven temperature is key to getting that golden, crispy crocant crust.
8. Bake the Bread:
Once the dough has risen and your oven is preheated, place the bread in the oven. Bake for 25-30 minutes or until the bread has a golden brown, crispy crust. If you want an extra-crusty loaf, place a small pan of water in the oven (on a lower rack) while baking to create steam. This will help develop a thicker, more rustic crust.
You can check if the bread is done by tapping it on the bottom—if it sounds hollow, it’s ready!
9. Cool and Serve:
Remove the bread from the oven and let it cool on a wire rack. The bread will be incredibly hot right out of the oven, so give it some time to cool down before slicing. Once cooled, slice it with a serrated knife, and enjoy the crispy, delicious crocant bread you’ve just made!
Tips for Perfect Crocant Homemade Bread
- Use Bread Flour for Extra Structure: While all-purpose flour works fine for this recipe, using bread flour will give your bread more structure and chewiness.
- Test Your Yeast: If your yeast doesn’t froth after 10 minutes, it might be expired. Fresh yeast ensures the bread will rise well.
- Let the Bread Rest: If you’re in a rush, it might be tempting to cut into the bread right away, but allowing it to rest for a few minutes after baking will improve the texture of the crumb.
- For a Crunchy Crust: If you love a really crunchy, thick crust, try adding a little extra olive oil to the top of the loaf before baking, or use a pizza stone for an even crispier result.
- Flavor Variations: You can easily add extra flavors to your bread. Try incorporating garlic, herbs (like rosemary or thyme), or even cheese to the dough for an extra burst of flavor.
Why Crocant Homemade Bread is So Special
What makes this homemade bread particularly special is the contrast between its soft, airy interior and its deeply satisfying, crunchy crust. The word “crocant,” which translates to “crunchy” or “crispy,” perfectly describes the delightful bite of the crust that’s achieved through high-heat baking and steam. The soft, pillowy interior complements the crisp exterior, creating a perfect balance of textures in every bite.
Making your own bread also gives you control over the ingredients. You can avoid preservatives and artificial additives commonly found in store-bought loaves, while also adjusting the flavors to your preferences.
Pairing Crocant Homemade Bread
Crocant homemade bread is incredibly versatile and pairs well with almost anything. Here are a few ideas:
- Soups and Stews: Serve it with a hearty bowl of soup or stew. The crunchy crust is perfect for dipping into your favorite broths or creamy soups.
- Sandwiches: Use this bread for sandwiches—whether it’s a classic turkey sandwich, a veggie-packed delight, or a grilled cheese.
- Buttered Bread: Sometimes, simply slathering a slice with butter or olive oil is all you need to enjoy the full flavor of this bread.
- Garlic Bread: Brush the warm loaf with garlic butter for a delicious garlic bread variation.
Conclusion: Fresh, Flavorful, and Crispy
Crocant homemade bread is the perfect blend of simplicity, flavor, and texture. With its crispy crust and soft, airy interior, it’s a bread that will impress everyone at the table. While it requires a little time to rise, the hands-on preparation is easy, making this recipe suitable for both beginner and seasoned bakers. Whether you’re using it as an accompaniment to your favorite dish or simply enjoying a slice with butter, this homemade bread will quickly become a staple in your kitchen. Happy baking!
ADVERTISEMENT
